
0. 모듈 설치
이제 React에서 사용할 국제화에 도움이 되는 모듈을 설치해야 합니다.
“react-i18next”와 “i18next” 두 가지가 있습니다.


npm i react-18next i18next공식 웹 사이트에는 –save를 입력하라고 나와 있지만 npm 5부터는 종속 항목에 자동으로 추가되므로 입력할 필요가 없습니다.
설치 후 JSON 파일을 확인합니다.

설치가 아주 잘 됩니다.
1. 기본 t-function 사용하기
위에서 설치한 모듈을 사용해보자.
기본 사용법은 다음과 같습니다.
import i18n from "i18next";
import { useTranslation, initReactI18next } from "react-i18next";

i18n
  .use(initReactI18next)
  .init(
     // 여기에 내가 사용할 리소스 JSON 데이터를 넣으면 된다.
  )

function App() {
    const { t } = useTranslation();


    return (
    <div>{t("hello")}</div>
);
이 전체 프레임워크가 준비되면 다음 return 문에서 t-function에 JSON 키를 포함할 것입니다.
예를 들어 저쪽에 있는 JSON 데이터에 이것을 넣자.
{
"resources": {
"en": {
"translation": {
"hello": "Welcome to React and react-i18next!"
}
}
},
"lng": "en",
"fallbackLng": "en",
"interpolation": {
"escapeValue": false
}
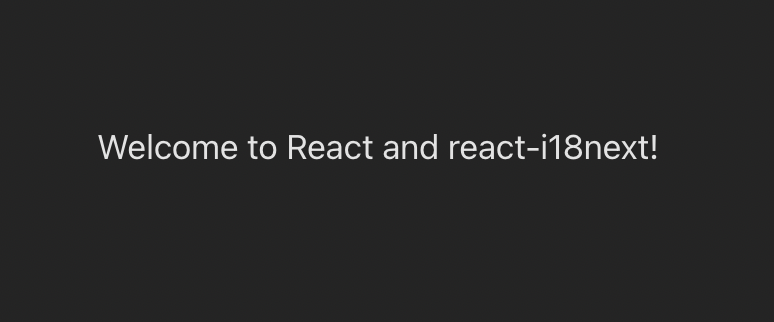
}이 JSON 데이터를 입력하면 번역 키가 hello인 값이 반환됩니다.
나는 이것을 별도의 JSON으로 가져와 구조화했습니다.
App.jsx 코드
import { useState } from "react";
// import reactLogo from './assets/react.svg'
import "./App.css";
import i18n from "i18next";
import { useTranslation, initReactI18next } from "react-i18next";
import languageJSON from "./json/language"

i18n
  .use(initReactI18next)
  .init(
      languageJSON
  )


function App() {
  const { t } = useTranslation();


  return (
    <div>{t("hello")}</div>
  );
}

export default App;
위의 코드를 보면 JSON 데이터를 languageJSON이라는 변수에 넣습니다.
src/json/language.json 파일
{
  "resources": {
    "en": {
      "translation": {
        "hello": "Welcome to React and react-i18next!"
      }
    }
  },
  "lng": "en",
  "fallbackLng": "en",
  "interpolation": {
    "escapeValue": false
  }
}
나는 이렇게 썼다.
다음 포스트에서는 다른 언어로 변환하려고 합니다.
이 언어로 번역할 수 있는 버튼도 만들어서 웹 앱을 만들어 봅시다.
2. 참고문헌
1. React-i18next 공식 홈페이지
https://react.i18next.com/getting-started
시작하기 – react-i18next 문서
이 모듈은 웹팩, 롤업 등을 통한 로딩에 최적화되어 있습니다. 올바른 진입점은 이미 package.json에 구성되어 있습니다. 최상의 빌드 옵션을 얻기 위해 추가 설정이 필요하지 않습니다.
react.i18next.com
끝.